Recently we spent some time in a large wind tunnel at the University of Ontario Institute of Technology, Canada, testing pilot chutes of all sizes.
During our careers as BASE jumpers, we have developed preferences and techniques based on what we feel works best for us. The pilot chute sizes, bridle lengths, and pilot chute type (materials, venting, shape, handle type, etc) that we use are not random – these are decisions we have arrived at after many years in the field and a lot of video analysis and aggregated feedback from experienced pilots.
But we still have questions. Things like "How much does a PC really pull when it is in wingsuit wake turbulence?" Or, "Is a 10' bridle better than an 8' bridle, and if so how much" And, "How does the inflation snatch force vary from PC to PC, really?" And finally, "Can we really measure this stuff predictably?"
The truth is that these factors are very difficult to test, and it's impossible to draw strong conclusions from the data we have. To say that pilot chutes, used with or without wingsuits, present a wide range of variables is a major understatement. Unfortunately, this article does not contain any groundbreaking answers. What it does contain is a series of graphs that will give you a rough idea of the drag force and stability of common pilot chute types. And some videos with neat images. Take from it what you like.
Strong Throw vs. Weak Throw
No major surprises here. We all know that weak throws suck. In the video above, we can see that a weak throw is a good way to cause your PC to interact with the bridle downstream. By tossing weakly, slowly, or dropping the PC, we allow more bridle to pass downstream of the PC before it is released or carried away. When the PC is upstream of a significant amount of bridle, it increases the likelihood that it will interact with the loops of bridle waiting for it. This may be one way that bridle knots and bridle/PC entanglements occur; the PC collides with a waiting loop of bridle (other possible causes are the PC and bridle mixing together in the "burble" on the top surface of the wing in wake turbulence, and packing methods).
A stronger throw helps to keep the PC clear of the bridle from start to finish. Conventional wisdom here states that you throw the PC as fast and far as you can, without totally ruining your body position, heading, and symmetry.
S-Folded Bridle vs. Standard (bridle stowed in mesh)
For wingsuit BASE, Matt G has been mostly packing his PC using the S-Fold method described here since 2010 and it is not a new concept in skydiving or BASE jumping – the theory is that this stages the bridle and helps to prevent it from dumping out into the airstream together with the PC.
Based on what we saw in the video captured from this session, we are unable to say that we have gathered further evidence that the S-Fold method is better. A far more important factor seems to be how well the PC is deployed (thrown).
As the PC is extracted and the first section of bridle is exposed to the airflow, the bridle is carried downstream. In the video, we can see that the airflow on the bridle alone can be enough to extract the remaining bridle from the BOC and even push it downstream together with the PC, which damages the "staging" theory of this packing technique. Stowing the bridle inside of a secondary smaller/tighter pocket inside the BOC (as some BASE rigs allow for) may help ensure staging here, but increasing bridle payout resistance is then a new issue.
We have seen some other possible bridle stow techniques being tested in the community, for instance, by James Yaru. Watch this space, our sport is evolving.
Reverse Handle?
Martin Tilley recommended that we test a reverse handle design: what if we put the handle on the bottom of the PC? So we did. The deployment using this modified design is labeled in the video. It appears to function. But, there is still a handle, there is still a bridle, and those things can still interact. More testing is needed.
Drag Force: Toroidal Arc vs. Standard Double Disc designs
There has been some debate about whether a toroidal arc PC, like the Snatch, pulls with the same force as a traditional PC. During the Snatch development, we stuck prototypes in a skydiving wind tunnel, attached to a simple scale, and pull force was comparable to traditional PCs across sizes tested (36"-42"). But as any tunnel ninja will tell you, first and second generation vertical wind tunnels are far from smooth. The drag force we measured backed up field testing, but the turbulence was not a benefit.
The UOIT facility, with its long recirculation loop and wind-conditioning devices, provided us with an opportunity to measure again with a more accurate load cell and smoother wind. The dimensions and wind quality of this tunnel allowed us to test drag force and also deployments, inflation, and stability. The following graphs show drag force of each PC tested at four different airspeeds per PC.
For the 36" and 38" sizes, this test is mainly an illustration of stability. We have three different pilot chutes here that would be used for a typical high airspeed BASE jump:
- 1. A traditional 38" with an apex vent.
- 2. A traditional 36" design with a hexagonal vent at mid-skirt (the Asylum Toxic).
- 3. A toroidal arc design (the Squirrel Snatch).
38" Pilot Chute Drag Force Comparison: Snatch 38, Asylum 36, Brand X 38
View Interactive Graph →What we are seeing here is similar average drag force but some variation in stability. The spikes on the chart are variations in load, caused by PC oscillation. Fewer spikes means more stability. Stability, as we know, is a crucial factor in PC performance. We can see that the toroidal arc PC (Snatch) is most stable, followed by the mid-skirt vent (Asylum Toxic), with the top vent PC (Brand X) being the least stable – indicated by the spikes in the graph.
Martin Tilley: "This data, combined with what we have seen in the field since 2014, clearly shows that the Snatch is a very stable pilot chute. The stability is a result of the design, and the 3D shaping of the panels overpowers all other factors. Even an imperfectly trimmed Snatch will most likely outperform a symmetrically trimmed double-disc PC design. We have also seen that there are significant variations in stability of double-disc designs. Symmetry and trimming are important factors that can be controlled during the manufacturing process."
Will Kitto: It is important to note that measuring a Snatch is done differently from normal pilot chutes. Standard double disc pilot chute diameters are measured flat. A 42" PC has a 42" diameter when flat on the table. Because a Snatch or any toroidal arc PC design contains 3D shaping, it will not lay completely flat. Therefore, the size of a Snatch is calculated in terms of projected surface area.
The following video and graph show several PCs tested at ascending airspeeds. Again, we tested three common 42" pilot chutes on the market today: top vent (Brand X), top vent (Asylum), and the toroidal arc (Snatch). The graphs show that stability was comparable across three types with the highest average drag force exerted by the Snatch.
42" Pilot Chute Drag Force Comparison: Snatch 42, Asylum 42, Brand X 42
View Interactive Graph →Finally, the following graph shows larger pilot chutes tested at speeds that begin somewhat typical for their size, but finish at far faster than they would (or should) ever be deployed in real life. Most relevant to their normal usage is the far left side of the chart, showing airspeeds in the sub 2 second region. Here the stability differences between the toroidal design and the traditional design are less apparent, with the Brand X PC performing similarly to the toroidal arc (Snatch) in terms of stability.
46-50" Pilot Chute Drag Force Comparison: Snatch 50, Snatch 46, Brand X 48
View Interactive Graph →PC Inflation
The following video is an assortment of 42" PC deployments executed at an airspeed comparable to a one second delay. There are three different types of PC, all size 42.
- Red: Toroidal Arc (Snatch) 42
- Blue: Toroidal Arc (Snatch) 42
- Navy / Black: Brand X 42
- Black / White mesh: Asylum AV 42
The wind speed in this test is 22mph (35kph), which is comparable to a 1 second delay. At 1 second, which would be the lower end of a stowed PC deployment, the inflation speed of each PC was comparable when packed similarly.
This was a relatively unscientific test. PCs were prepared in loose approximations of stowed or handheld packing techniques, or in other non-traditional packing methods.
The most important information gleaned from this test, is: The method of PC packing makes the most significant difference in the speed and quality of the inflation. It was clear that the more condensed the mesh is, and the more the skirt is wrapped around the mesh and bridle, the slower the inflation. Across all PC types tested, packing method was the most major factor in inflation speed. It is very easy to create a "hesitation" via certain methods of PC packing. In the video, the speed and quality of the inflation of each PC is not random, it is a direct result of the packing method and PC type.
PCs packed in the standard BOC deployment method took significantly longer to inflate at this one-second-equivalent airspeed. In our opinion, this highlights the need to pack according to your intended delay, and to reconsider many common PC packing methods used for short delays. If you are going stowed and plan to only do a one-second delay due to the object height or the amount of altitude you are able to consume, consider going hand-held instead. If you are going hand-held, then think carefully about how you fold / pack your PC and hold it, as this is an important factor in how quickly your PC will inflate and your parachute will be extracted.
Again, across all types of PCs, the evidence points clearly to packing method being the single most important factor for speed of inflation at this airspeed.
Martin Tilley: "This is in line with what we have known, but is too rarely discussed: packing methods for short delays are critical. Many common packing methods for 0-2 second delays are poorly indicated, and need to be reconsidered by users."
"Snatch Force"
Intuitively, BASE jumpers have known that the drag force of a pilot chute is higher during the first moments of initial inflation. This is often referred to as "snatch force". The physics behind this is complex and include the inertia of the PC, the actual mass of the air that is disturbed, and the temporary deformation of the PC itself.
One important takeaway from our testing is that Snatch force is caused by total drag force of the pilot chute. More drag force equals more snatch force. Comparing snatch force alone across pilot chute types is an incomplete review of the data because total drag force of the pilot chute is the determining factor.
For this test, we used 3 different 42" PCs. One toroidal arc (Snatch) design, and two traditional designs. When tossed to inflate on an 8' bridle, there were measurable spikes in drag force during the initial inflation.
Notably, the Snatch's snatch force was measurably higher than other PCs tested. This is in line with the higher total drag force in the 42" drag force test presented above.
In short, more drag equals more snatch, and the easiest way to get more drag is to increase PC size. Because PC sizes vary from use to use and type to type, what this means to users is that our decision process for choosing PC drag can be based on PC size. Our decision for PC stability can be based on PC type.
Martin Tilley: "One takeaway from this is that if you feel that 'snatch force' is important, then look at the total drag production of your PC."
42" Snatch Force Comparison: Brand X 42, Asylum 42, Snatch 42
View Interactive Graph →PCs in Wingsuit Wakes
Over the past several years, we have been treated to videos and screen grabs of wingsuit vortices illustrated by pilots flying through clouds or water. These vortices show how air spills off of and away from our wings. A very crude description would be to say that the general tendency is for air to slip off of the bottom surface and roll onto the top surface in a rotating pattern. This helps to explain how your PC can end up stuck to your leg wing if you "drop" or fumble it. When the PC is not tossed past this circulating flow, it can be caught in it – if so, that flow (particularly at high AoA / slow / inefficient flight) is headed straight for the top surface of your leg wing, and / or the middle of your wake. This is part of the reason why the hand-tossed BOC deployment remains standard – it allows us to throw our PC well to the side and into the laminar flow to be carried downstream away from our leg wing and the strongest section of turbulence in our wake. Evidence suggests that is important to deploy your PC clear of these vortices.
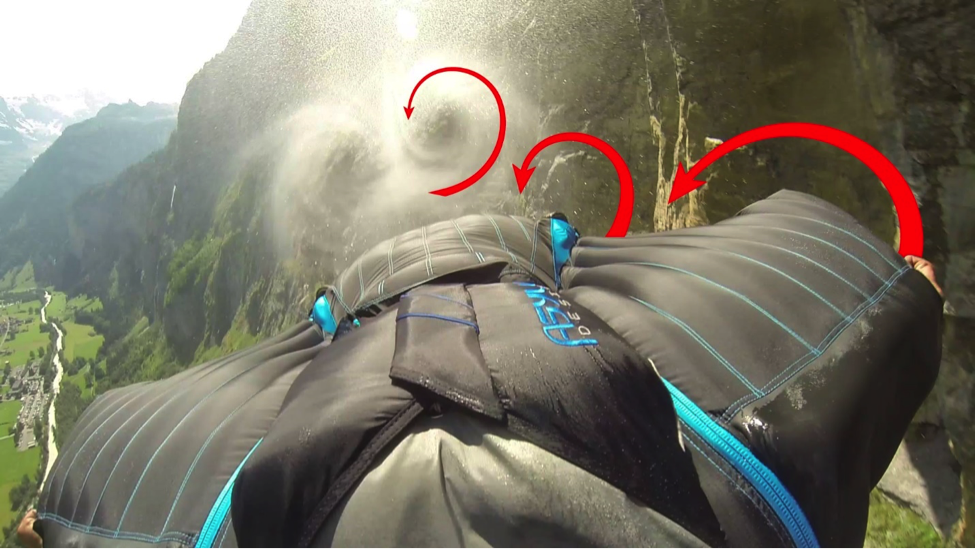
(Photo by David Covel)
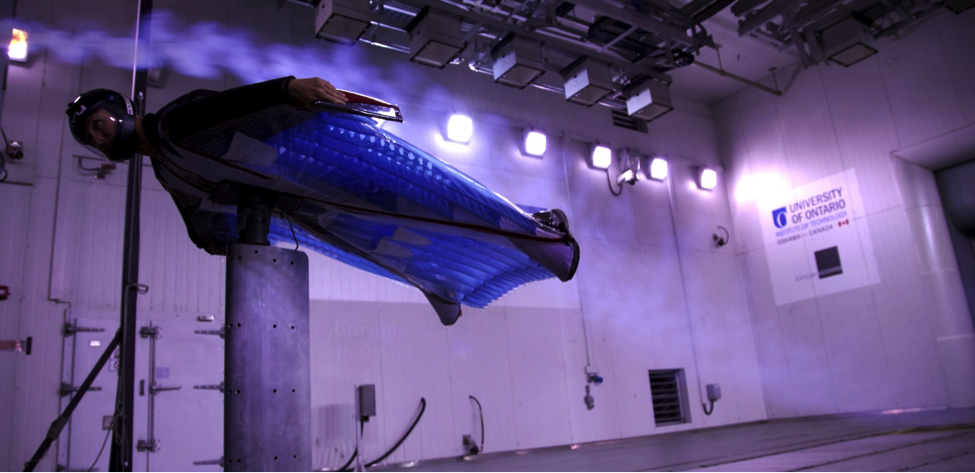
While flying in the wind tunnel with a smoke wand, and adjusting AoA, we were able to see the wake turbulence increase in severity with AoA increase. It was a clear illustration of how important it can be to have clean air flowing over the top surface of your wingsuit during deployment. Deploying in a massive flare at an extremely high AoA and low airspeed is possible and can work fine, depending on your altitude, PC type, and bridle length. However, your PC will always have the greatest chance of success when deployed into clean air. Here are a few more thoughts on wingsuit openings: http://www.base-book.com/some-thoughts-on-wingsuit-openings
Bridle Length
Wingsuit bridle length is a funny topic. Some people firmly believe that 12' is the only safe length, even for skydiving(!). Some people stick with 10'. Most people measure from pin to PC, some define length from loop to loop. Much has been written about this, and the only thing that everyone seems to agree on is that 6' is too short ;-)
After playing with this in the tunnel and having a familiarity with the wide range of wingsuits, pilot types (as in so many different people), and people's techniques at deployment, we can safely say that there are countless variables here and it's impossible to make a rule about bridle length based on what we know currently in the sport.
But there are some clear guidelines and we know what has been working. We know that the bridle has to be long enough to clear the worst of our wake turbulence, whether we are jumping subterminal slick, or terminal wingsuit. It has to be long enough to where when we throw it, it doesn't reach the end of its length and snap back into the wake early. But it's also safe to assume that there is a length that is too long. The longer it takes for the PC to reach bridle stretch and begin to inflate in clean air, the longer it has to entangle with the bridle. The more bridle there is, the more loops there can be for the PC to collide with.
The drag force results of our testing on this were inconclusive. We found negligible differences between the drag forces of 6, 8, and 10 foot bridles, probably due to the fact that the pilot's AoA was changing as the PC pulled him around in the tunnel. The varying AoA and the movement of the PC in the wake seems to have muddled the data.
Overall, this is a personal decision. Matt G has decided to stick with 8' from pin to PC, 10' total length, for reasons described here.
In Summary
Martin Tilley: "It is more relevant to me that a PC is consistent from use to use, regardless of the actual performance or comparative performance. This relates to the timing and coordination of me, the jumper, combined with the functionality and end results of the system. If the timing is the same for every use, then I can anticipate and prepare for the moment of parachute extraction. This allows me to remain calm, comfortable, and balanced for deployment. It is important to know that 'This PC works like this, so I make my plan based on that information. If it works differently from my last experience, it puts in motion the beginnings of plan B, C, etc.' This consistency and continuity from use to use is an important factor. Awareness, practice, and careful repetition with consistency across equipment and packing methods will allow you to isolate the causes of variance in your parachute deployments."
Will Kitto: The Snatch development project and the extensive wind tunnel and field testing that we have completed has afforded us much time to think about PC design, packing, and use. The variables are more complex than a PC freefall chart, with more variables than most jumpers give credit to. But the factors are also quite simple: Choose a PC that is symmetrically constructed, stable when deployed, and appropriate in size. Then, pack it in a way that will allow it to inflate cleanly. Pilot chutes do have an affect on parachute deployment – they are the first link in an important chain.